WHAT IT DOES
Many UFO's are known to cause magnetic and electromagnetic anomalies during their sightings. Anomalies that include magnetic compasses spinning wildlyor acting erratically, radio static and automobile engine failure and stalling.
The UFO detector continually monitors it's surrounding area for any magnetic and electromagnetic anomalies. When the UFO Detector senses an anomalie it signals by flashing a LED and beeping. Once triggered the UFO Detector will continue to signal until it is reset.
HOW IT FUNCTIONS
The UFO Detector uses a state of the art Microcomputer interfaced to four Hall magnetic flux sensors to monitor any magnetic and electromagnetic anomalies against the Earth's natural magnetic field.
BATTERY
The UFO Detector uses a 9-volt lithium battery for optimum sensitivity and long life. While the lithium battery looks identical to a standard 9V alkaline battery, there are two important differences. First and foremost the lithium battery contains very little ferrous material (ferrous materials are materials that are attracted to a magnet). Any ferrous material in close proximity to the Hall sensors will reduce their sensitivity. The case of the alkaline batteries are made of a ferrous material. In contrast to the case of the lithium batteries that are made from plastic (non-ferrous). In addition the lithium battery will last 3x longer than a standard battery. For these reason we only recommend 9-volt lithium batteries.
SET UP AND TESTING
Setting up the UFO Detector is easy. The brass base of the UFO Detector and green florescent wand are separate items. This allows you to move or rotate the wand to your liking without moving or disturbing the base, which could trigger the detector (see testing and false triggering below).
Choose a location that you feel is relatively clear of external magnetic fields and large ferrous objects. These may cause false triggering or reduced sensitivity respectively.
Install a fresh lithium battery as per the "Changing the Battery" instructions.
Once the battery is installed keep the unit up-side down to prevent the UFO Detector from triggering until you are ready to set it down in its location. When the UFO Detector is placed upright, you have approximately seven seconds to place the UFO Detector in its location. When the seven seconds have elapsed, the UFO Detector will flash its LED and beep once to let you know its in its detector mode.
Place the green fluorescent wand in the base. Rotate the wand to your liking.
Once in its detector state, the UFO Detector will signal any magnetic or electromagnetic anomalies and any change it senses in our Earth's magnetic field.
TESTING AND FALSE TRIGGERS
There are many ways to test the UFO detector. One of the easiest is simply to rotate the base 90 degrees. The UFO Detector can not tell that its been moved and sees its movement (rotation) as a change in the Earth's ambient magnetic field and starts signaling (flashing a super bright LED and beeping). Once triggered the UFO Detector will continue to signal until it is reset, by turning the unit upside down for a few seconds.
Another way to test the UFO Detector is by waving a magnet an inch or so away from the detector. If one rushes a magnet past the detector very quickly it may not trigger the detector. The reason is that both the sensor and Microcomputer dampen and ignore events that occur within a two second time period to help prevent false triggering. In the event that a real UFO event occurred within a two second time period, having the UFO Detector would not help in capturing it.
In addition to passing a magnet by the detector, one can obtain similar results by waving a ferrous materials (iron) close to the detector as described for the magnet.
Other possible terrestrial triggers can include external electromagnetic fields caused by electronic equipment being turned on or off.
CHANGING AND INSTALLING THE BATTERY
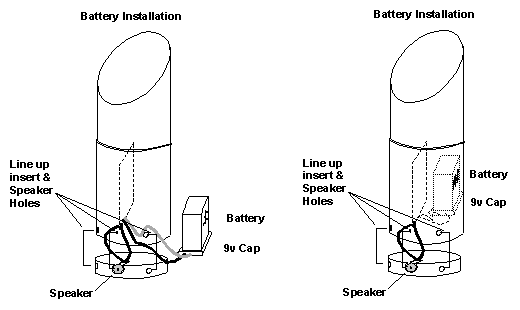
Remove the green acrylic wand from the base and place it to the side. At the bottom of the base are three small brass screws. Remove them with a small Philips screw driver. The bottom piece should slide out. If not gently shack the base until the bottom piece slides out. Remove the old battery and replace with a 9-Volt lithium battery. Place the battery in the case bottom side up, so that the 9-Volt battery clip is facing down, see drawing. Line up the three screw holes on the bottom piece, with the three holes on the case, making sure the speaker is also alined with its speaker hole then slide the bottom piece back in. Carefully screw the three brass screws back into the base.


