
Table Of Contents:
Using Servomotors with the PIC Microcontroller |
Using Servomotors with the PIC Microcontroller
Servomotors are used in most RC cars, boats, helicopters and planes. They are often used to control sensitive adjustments such as steering, but have many other uses in robotics and positioning control systems.
Servomotors are basically geared down dc motors with positional feedback control, allowing for accurate positioning of the rotor, with a range of 90 degrees. They can also be modified to allow for continuous rotation.
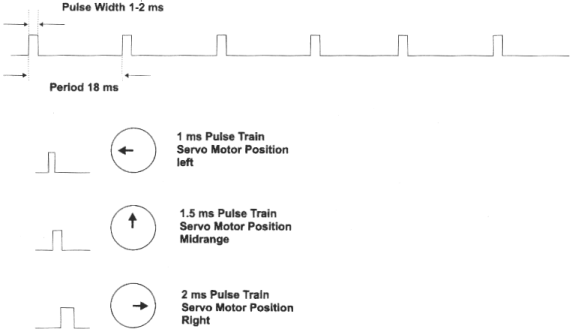
Servomotors have three wires; usually red, black and white. The red wire is for +VDC, the black for ground, and the white is for position control. This control signal is a variable-width pulse, which can be varied from 1 to 2 ms. The pulsewidth controls the rotor position.
A 1.0 ms pulse rotates the shaft all the way counter-clockwise. A 1.5 ms pulse puts the rotor at neutral (0 degrees), and a 2.0 ms pulse will position the shaft all the way clockwise. The pulse is sent to the servo at a frequency of approximately 50 Hz. The relationship between the pulsewidth and the rotor position can be seen in figure 1 (below).
First Servomotor Control Program
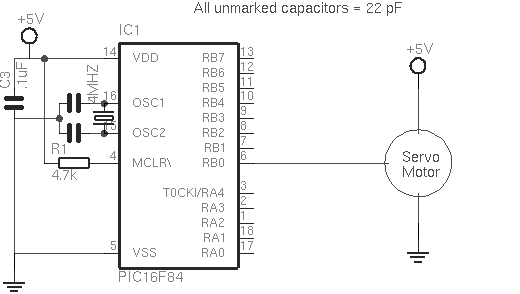
In our first program , we will simply sweep the servomotor from CCW to CW and then sweep back. The program will be kept simple as to demonstrate the principles of controlling a servo with a the PIC Basic language. The schematic can be seen in figure 2 (below).
The variable pw controls the pulsewidth, and is started at 100 (extreme left, -45 degrees). The program sends the pulse out to the servo, and then is increased by a value of 1 until it reaches 200 (extreme right, 45 degrees), at which point it will reverse the rotation.
Listing 1
' First servomotor program
' Sweeps left to right, then reverses
Symbol B1 = pw
pw = 100
sweep: pulsout 0,pw
pause 18
pw = pw + 1
if pw > 200 then back
goto sweep
back: pulsout 0,pw
pause 18
pw = pw - 1
if pw < 100 then sweep
goto back
' create a variable pw
' start at extreme left
' send pulse to motor
' set frequency to about 50 Hz
' increase pw by 1
' at extreme right, turn CCW
' otherwise, continue
' send pulse to motor
' set frequency to about 50 Hz
' decrease pw by 1
' at extreme left, turn CW
' otherwise, continue
End of Listing 1
If desired, we could extend the rotation of the servomotor to a full 180 degrees (-90 to 90 degrees) rotation by decreasing the minimum pulsewidth to below 1 ms and increasing the maximum pulsewidth to over 2 ms. This can be accomplished with our previous program by modifying the occurances of 100 and 200 to your desired minimum and maximum pulsewidths, respectively.
However, a note of caution: the pulsewidth required for servos varies from brand to brand. One motor may require a 2.8 ms pulsewidth for maximum rotation, while another may only need 2.4 ms.
Furthermore, servomotors have end stops that limit its rotation. If you send the motor a pulsewidth that is beyond the end stops, the motor will keep trying to turn. A motor in this stalled condition not only draws more current, but also puts wear on the internal gears, shortening the lifespan of the motor.
Manual Servo Control
Our next program will allow you to control the direction of the servo manually via a SPDT switch (with a center-off position) connected to ports B1 and B2. Without a center-off position, you will have to use two switches. A schematic is shown in figure 3 (below).

With the switch in the center position, the servo will not turn. When it is moved into forward, it will turn one way. Moving the switch down will make it turn the opposite direction. This program as-is will limit rotation to 45 degrees off-center, but can be modified to extend rotation through the aforementioned methods.
Listing 2
' Manual control of servo direction via
' an SPDT switch.
Symbol B1=pw
pw = 150
check: if pin1 = 0 then left
if pin2 = 0 then right
Pulsout 0,pw
pause 18
goto check
left: pw = pw + 1
pulsout 0,pw
pause 18
if pw > 200 then max
goto check
right: pw = pw - 1
pulsout 0,pw
pause 18
if pw < 100 then min
goto check
max: pw = 200
goto check
min: pw = 100
goto check
' create a variable pw
' begin at center position
' is pin 1 active?
' is pin 2 active?
' send current pw
' set frequency to about 50 Hz
' check again
' increase pulsewidth
' send current pw
' set frequency to about 50 Hz
' dont go over 2 ms
' go back and check again
' decrease pulsewidth
' send current pw
' set frequency to about 50 Hz
' dont go under 1 ms
' check again
' cap pw at 2 ms
' check again
' cap at 1 ms
' check again
End of Listing 2
Multiple Servomotors
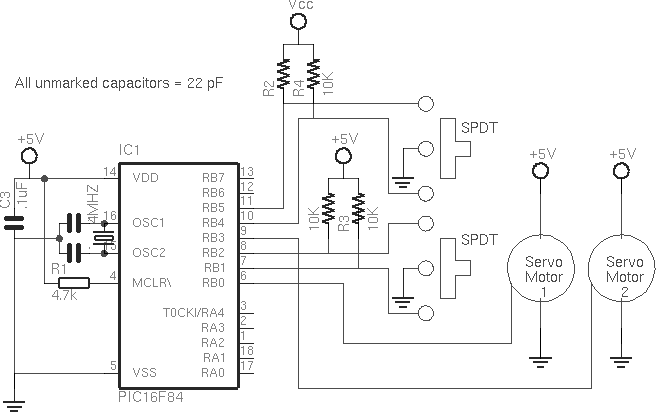
The program uses two pulsewidth variables, pw1 and pw2; and two sets of routines, left1 and left2, right1 and right2; one for each motor. As you can see in the schematic, the first servo is wired as per the previous circuit. The second servo is now using B3 as it's pulse out, and B4 and B5 for the SPDT switch.
Listing 3
'Manual control of two servomotors using 2 SPDT switches
'Use B1 to hold pulsewidth variable for servo 1
'Use B2 to hold pulsewidth variable for servo 2
'Initialize Variables
B1 = 150
B2 = 150
'start servo 1 at center position
'start servo 2 at center position
start:
IF pin1 = 0 Then left1
IF pin2 = 0 Then right1
IF pin4 = 0 Then left2
IF pin5 = 0 Then right2
PulsOut 0, B1
PulsOut 3, B2
Pause 18
GoTo start
'check for switch closures
'is sw1 left active?
'is sw1 right active?
'is sw2 left active?
'is sw2 right active?
'send current servo 1 position out
'send current servo 2 position out
'Routines for Servomotor 1
left1:
B1 = B1 + 1
PulsOut 0, B1
PulsOut 3, B2
Pause 18
IF B1 > 225 Then max1
GoTo start
right1:
B1 = B1 - 1
PulsOut 0, B1
PulsOut 3, B2
Pause 18
IF B1 < 75 Then min1
GoTo start
max1:
B1 = 225
GoTo start
min1:
B1 = 75
GoTo start
'increase the pulse width
'send current B1
'send current B2
'set frequency update about 50 hz
'maximum 2.25 millisecond
'decrease the pulse width
'send current B1
'send current B2
'set frequency update about 50 hz
'minimum .75 millisecond
'cap max B1 at 2.25 milliseconds
'cap min B1 at .75 millisecond
'Routines for Servomotor 2
left2:
B2 = B2 + 1
PulsOut 0, B1
PulsOut 3, B2
Pause 18
IF B2 > 225 Then max2
GoTo start
right2:
B2 = B2 - 1
PulsOut 0, B1
PulsOut 3, B2
Pause 18
IF B2 < 75 Then min2
GoTo start
max2:
B2 = 225
GoTo start
min2:
B2 = 75
GoTo start
'increase the pulse width
'send current B1
'send current B2
'set frequency update about 50 hz
'maximum 2.25 millisecond
'decrease the pulse width
'send current B1
'send current B2
'set frequency update about 50 hz
'minimum .75 millisecond
'cap max B2 at 2.25 milliseconds
'cap min B2 at .75 millisecond