
The next step is to make a drive locking fixture in the sphere that prevents the gear box shaft from turning. This forces the gearbox itself to rotate inside the sphere, changing the center of gravity and moving the robot along. The drive fixture must at the same time allow the globe to be assembled or unassembled at will. The system I devised is illustrated in figure 4. Although I built all the drive components out of transparent plastic, you can fabricate the parts out of other materials like brass and wood.
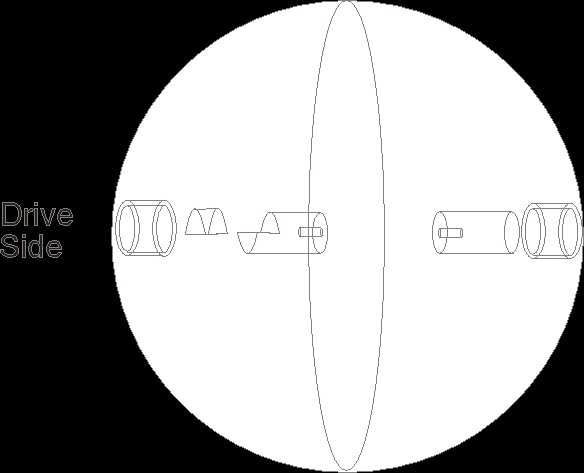
Figure 4
The first component is a small length of tubing 5/8" OD, 1/2" ID about 3/8" long. This tubing is glued to the center of the half sphere. Using the marks as a guide. Inside the tubing, glue a 1/2" diameter half round about 3/8" long. This piece may be glued inside the tubing before the tubing itself is glued into the sphere.
Next machine a small length of 1/2" diameter solid rod. On one end of the rod a 3/8" half section is removed. This is accomplished using a hack saw or coping saw. First make a cut directly down the center of the rod about 3/8" deep. Then make a horizontal cut to remove the half section. Check to make sure this shaft fits easily, into the 3/8" tube and half round assembly inside the half sphere. If not, file the cut end it until it does.
At the opposite end of this rod, drill a hole down the center that will fit the shaft from the gear box.
Note: On the prototype robot I made the second shaft a drive connection also. Only when the robot was finished did I realize that this was unnecessary. A single drive connection works just as well as a double.
The second half sphere is easier to make. Glue a small length of 5/8" OD, 1/2" ID tubing to the center of the half sphere, using the mark as a guide. Cut a small length of 1/2" diameter solid rod. Check to make sure the shaft fits easily into the 5/8" tubing. If not, obtain a small piece of 100 grit sandpaper. Wrap the sandpaper around 1/2" length on the end of the shaft. Twist the sandpaper around on the shaft to sand the end. Continue sanding until the end of the shaft fits easily into and out of the tubing. Next, drill a hole down the center that will fit the shaft from the gear box.
We want the gear box to be positioned in the center of the sphere. Place the shaft of the gear box in the plastic rod. Place the rod in on half sphere of the globe. Position the gear box so that it will lie in the center. Mark the depth the gear box shaft must go into the plastic rod on the gear box shaft. Remove the gear box shaft. Mix a small amount of 2 part epoxy glue. Coat the gear box shaft with the epoxy glue and insert it into the plastic rod. Let the glue set before proceeding.